I felt like this would be a good first kit to solder together and ordered a Tuna Power System Kit from Rex (W1REX at QRPME.com). The kit arrived and the build instructions on the web looked very straight forward. However, the diode included with the kit would only work with small batteries. An option was to put in a diode with a higher power rating rather than the supplied 1N4004. So, I decided to order a small quantity of 1N4001 diodes. I found a set of ten diodes at Adafruit.com for $5.75 including shipping. Turn around on the order was very fast and I received the diodes three days later.
The instructions, as I said, seemed to be pretty straight forward, so I began building. It took me about four hours over two days to do the build, which included unsoldering several resistors and moving them to the right spot after making a pretty significant error.
I had a lot of problem reading the color codes on the resistors, even with the help of a 3x magnifying glass. Further, my inexpensive volt-ohm-meter (VOM) wasn’t accurate enough to figure out the exact resistance (even when shorted, the VOM would read a resistance of 2.5 ohms). There were some missing components and a couple of components in the kit that weren’t needed (several zero ohm resistors). Rex provides outstanding customer service and the situation was corrected literally over night.
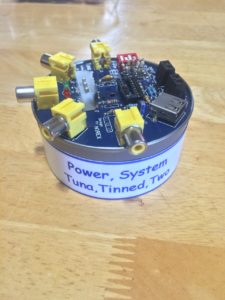
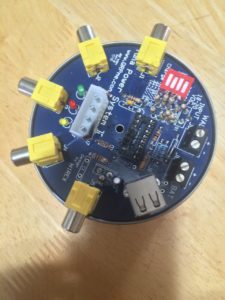
The power supply takes an input voltage from 15 to 20 volts DC and provides constant 12v out to five RCA jacks and to the battery connection. It also provides a 5v output to a USB connector and 5 volts and 12 volts to a molex connector. The suggested input device was a 20v power supply to an old printer. At the local thrift shop I found a 20v out power supply to an HP printer, cut off the plug at the end so that it would connect to the input jack.
So, I’ve ordered another Tuna Power System Kit … plus several other items.
First, I ordered a 10x / 20x magnifying glass from Amazon. This glass has two LED lights which provide very nice illumination. The resistors are now much easier to read and it’s much easier to inspect the solder connections on the board.
Secondly, I needed a bench power supply … one where I could set the voltage and the current with shorts prevention. The problem with the first unit was probably a short circuit. A short circuit means that the device will pull as much current as the source will give, and in this case the 20v old printer supply would ship up to 20 amps on demand, more than enough to burn up the integrated circuit and surrounding components. A bench supply that would detect a short and shut down before something is damaged or catches fire was now a requirement for my kit building activities. After some research, I ordered one from Amazon.
Thirdly, I needed a much more accurate VOM that also included the ability to test and read capacitors. I ordered that from Amazon.
Finally, I needed a much finer point on the soldering iron to better prevent shorts between components. I found these also on Amazon.
All of that has arrived. The new power supply is now on the bench and ready for assembly. Nopefully no “magic smoke” this time.
One thought on “Letting Out the “Magic Smoke””
Comments are closed.