We had several days of high winds last week. My fan dipole suffered greatly from the wind! One leg came unbolted from the center connection and fell to the ground. In addition, one of the guy ropes holding the far end of the dipole became unattached as the turnbuckle gave way. When repairing the dipole, I decided to put in a 1:1 balun to choke off ay RF energy that might come back down the outside of the feedline. Now the SWR is huge! Most of my power is not getting out the antenna!
Meanwhile, we’ve had another seven inches of snow. It’ll be a while before I can get out to the antenna to try and figure out what’s wrong. Dang!
For quite some time I had seen a very high noise floor across most of the HF bands and it seemed to be getting worse. Very often the noise floor would be S9 or S9+ on 80 meters, 40 meters, and 20 meters. Making SSB contacts was very difficult because I simply couldn’t hear the other stations. FT8 was working fairly well, but it was clear from the decoding window that there were a lot of stations being replied to that my equipment wasn’t hearing.
Then we had a significant power outage due to a wildfire. My FT-897D has battery power, the batteries were fully charged, so I turned on the radio … and the noise was gone! The noise floor was down to about S3 or S4 across all the bands. The noise was definitely QRM … man-made interference.
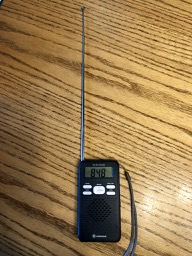
My AM/FM/Short Wave Radio
Google search indicated that an AM radio with a reasonable antenna could be used to track down a noise source. I had an AM/FM/Short Wave little radio somewhere. I found it, put in some batteries, tuned to 540 kHz where an AM radio station was supposed to be, and heard the same noise which was covering up the radio station.
Thinking that the noise was coming from somewhere in the neighborhood, I went outside and found the noise decreasing as I went away from the house! The noise source was somewhere inside the house. Next stop was the basement and the circuit breaker panel. I turned the breakers off and on one by one. When I turned the breaker off for the “West Bedrooms”, the noise went away. It came back as soon as the breaker was turned on.
The house has two upstairs bedrooms on the west end that we don’t use as bedrooms. One has been converted into a study / piano room where Nina has her desk, computer, and stuff as well as the piano. The other room has my desks, computers, ham radio equipment, and all that related stuff. The noise was coming from one of these two rooms.
It wasn’t coming from Nina’s study. In my room the noise was much louder and as I ran the radio around the room the culprits were immediately clear!
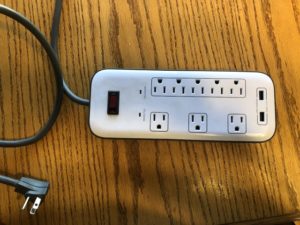
Power Strip with USB Charging Ports
I had two power strips with USB ports in the room. As soon as I switched them off, the noise mostly went away. I knew there was another of these power strips in the master bedroom. Turning that one off eliminated the rest of the noise.
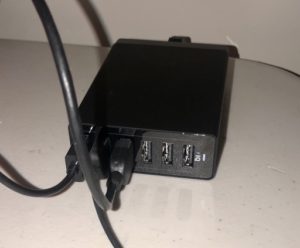
Anker Six-port USB Supply
These were expensive power strips! They are now replaced with normal cheap strips with no USB ports. I picked up an Anker six-port USB power supply which produces no noise. It’s now taking the place of the USB ports on those expensive power strips … which power strips are now at Deseret Industries. Hopefully they’ll be used in houses that don’t listen to AM or Short Wave radio!
Every year on the first Saturday in June since about 2009 Pocatello, Idaho has hosted a grueling mountain trail race. Runners had the option of running a 100 kilometer or a couple of shorter lengths. This year the race was expanded and lengthened to a 100 mile, a 50 mile, and a 21 mile race. Further, the 100 mile race would kick off at noon on Friday June 1st and the racers would run through the night Friday night and into the afternoon or evening on Saturday, June 2nd.
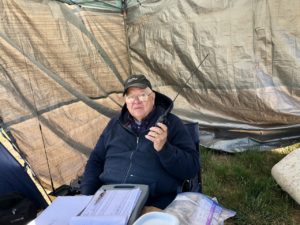
Roland Working the Radio
Nina and I were invited to provide communications support at the City Creek aid station located about 63 miles into the race for the 100 mile runners. The 50 mile runners would start at 5am on Saturday morning and 13 miles later go through the City Creek aid station.
The aid station was schedule to open at 11:30 pm on Friday night and remain open until 10:30 am on Saturday morning. In addition, any 100 mile runners had to arrive at City Creek not later than 10 am on Saturday morning in order to continue for the rest of the race.
Nina and I arrived at the aid station location about 8 pm on Friday evening as I wanted to set up while we still had a bit of daylight. We’d then kill time until the real opening time. The aid station volunteers were there as we arrived with the same intention: getting set up while there was still some daylight.
The first runner, a 100 miler, came into the aid station at 12:20 am on Saturday morning. Throughout the remainder of the morning, 100 mile runners trickled into the station, got some refreshment, tanked up on electrolites, and continued on their run. The first 50 milers came in about 7:15 am and all of them were in and out of the aid station by 9:30 am. At that time there were still fourteen 100-miler runners on the course who had not yet arrived at the City Creek aid station.
The 10am cutoff time came with five runners still unaccounted for. At 11:15 am three of them came into the aid station. They had gotten off the trail earlier and spent more than an hour trying to figure out where the trail was when they stumbled upon the course sweepers who escorted them to the City Creek aid station. The course was laid out in segments and two volunteers acted as “sweeps” to go behind the last person on the trail in that segment so that when they arrived at the next aid station, we could be assured that no one was on the course behind the sweepers.
We arranged for the three runners to be transported to the finish line and then went about figuring out what happened to the two other racers. One we eventually determined had dropped out of the race earlier at a point close to a road but hadn’t told anyone until they were driven by a family member to the finish line to turn in their ID chip (an RFID chip used the by the timing system which kept the official race times). By late Saturday afternoon when Nina and I left, there was no additional information on the other unaccounted-for runner.
So What Did We Do all Night and Saturday Morning?
First, radio communications to the net control station located at the finish line was our priority resonsibility. We reported when we opened, any significant events (such as the first male and first female runners in the 100-mile and 50-mile races), information from the runners about course conditions, and information about any runner who decided to drop out of the race at City Creek. If needed we would summon medical assistance or call 911 if needed. If the aid station itself needed anything, we could call net control to send it up.
In addition, we answered questions from other aid stations about specific runners, usually whether or not they had gone through the aid station and when. Often these were answering questions from friends or family of a specific runner. These questions would come via net control.
Secondly, we tracked all scheduled runners into and out of the aid station. When a runner arrived, the arrival time was noted. When he (or she) departed, the departure time was noted. Recording the 100-milers was pretty straight forward. After 63 miles, these racers were pretty well spread out giving lots of time between each runner. The 50-milers, however were only 13 miles into their run and they would arrive in groups. It took two or three of us to note all of the incoming or outgoing runners and get their information logged.
With an accurate tracking log, we were able to know which runners were still to come and by the cut off time know whether or not all runners were accounted for. We didn’t want to have any lost racers out there in the mountains somewhere without us knowing and able to launch a search.
How Did the Communications Work?
There were a dozen aid stations spaced along the course. Line-of-sight communications across the entire course was not possible at all. The course was divided up into four sections with a cross-band repeater serving each section. The radio operators in the section used a specific VHF simplex frequency which was picked up by the cross-band repeater and repeated out on a UHF simplex frequency. The cross-band repeaters were up high on hilltops and they all had line-of-sight communications with each other. The cross-band repeaters were linked on the UHF side and served the aid stations in their section on the VHF simplex frequency. All of that funneled into net control.
In case of issues, there was also a regular amateur radio 2meter repeater on Scout Mountain (the race’s namesake mountain) that most of the aid stations could hit (some of them with a LOT of steam on their signal). There was a period of time early on Friday evening when an issue with one of the cross-band repeaters necessitated using the Scout Mountain repeater. That issue was resolved and normal communications were restored.
How Cold Did it Get?
We knew the forecast … a low of 37 degrees Friday evening. There was a period when I’m sure it was around -50 degrees!! We were somewhat prepared, but will double down on cold weather preparation for next year. According to the weather service, temperatures at the Pocatello Airport got down to 42 degrees. Up in the mountains the temps were up to 10 degrees cooler. It definitely got cold … but the runners seemed to love it.
Would We Do It Again?
Well, this was my 5th year working one of the aid stations, Nina’s 3rd year. We seem to be addicted…. If invited, we’ll be back next year, health and circumstances permitting.
Meanwhile, there are several other events in our area in Utah needing communications support. We’ll do some of those, and report them here!
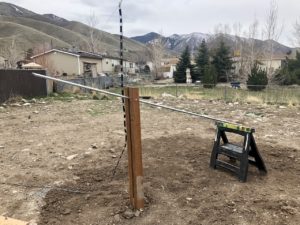
I tried 3/4″galvanized steel conduit and it wasn’t going to hold up. Far too much wiggle in the mast and it was impossible to get stood up without bending. So, I left the 10′ section of 3/4″ conduit as a kind of a gin-pole and went to 1-1/4″ galvanized steel conduit. The smaller size was rated for about 95 pounds while the larger size was rated for about 275 pounds. A significant difference for sure. So, yesterday afternoon everything was ready for the mast to be walked up into place.
A couple of fellows in the neighborhood volunteered to come over to help. It took about 10 minutes to put the mast into position, cinch it down, and hoist up the messenger line with the coax. That was enough for Tuesday evening. The finishing touches would wait until today (Wednesday, April 25th).
The Messenger Line and Coax to the House
The messenger line keeps the coax up in the air and above our heads. I did manage to guess correctly on how many carabiners were needed on the messenger line.
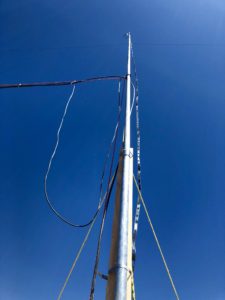
At the top of the mast I put a 2-meter J-pole antenna which will eventually be connected to an AllstarLink node. I just need to find my Raspberry Pi computers. There in a box somewhere!
Looking Up the Mast
This afternoon I completed the work to finalize the bracing for the mast and attached the LMR-400 coax to the window line coming down from the G5RV.
It’s in the later evening on the 25th now and I’m listening on the 40 meter band. That band is really booming tonight. I’m hearing signals from coast to coast as well as north and south. Just finished a QSO with Eric, KK6F in southern California. He was copying my 100 watt signal at a 57-58 whereas his amplified signal at 400 watts was booming into here. I think the antenna works. I sure is quiet compared to the G5RVJr up on my roof!
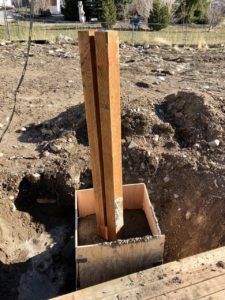
After letting the concrete harden over the weekend, Jimmy “The Handyman” came over on Monday. We pulled out the forms and filled in the hole. There was just enough dirt to be able to fill the hole, but I’m sure it’ll settle and compact. I really appreciated Jimmy’s help. I can get the rest of the project done now.
Yesterday I drilled a hole in the rigid conduit and the 4×4’s but ran out of time. This morning the next step came together. The holes lined up (!!) and the pivot point is in place.
So, the first ten feet of mast is ready. Twenty-five feet left to go!
The remaining steps?
Get three more lengths of rigid conduit from Home Depot, nineteen carabiners, and 100′ of paracord
Cut one of 10′ lengths of rigid conduit to a six-foot length (put the 4′ section aside for some possible future project)
Screw the two 10′ sections and the one 6′ section together with the section already installed. Make sure they’re tight
Install a hook about 12′ up for the messenger line coming from the house
Tie carabiners every foot and a half along the paracord messenger line. The two coax cables will ride along the messenger line in the carabiners. The messenger line length is 29 feet from the house to the mast
Install the pulley for the G5RV center and pull rope
Install the 2-meter J-pole
Measure (thrice), mark (twice) and cut the coax to length
Install connectors on both ends of the coax cables
Thread the coax cables through the carabiners
Connect the coax for the J-pole to the J-pole
Lift the mast upright and secure to the 4×4’s
Secure the bottom of the window-line for the G5RV antenna. The window-line needs to be at least six inches away from the conduit so they don’t interact
After almost three weeks of rain, snow, freezing temperatures, more rain, and more snow, a couple of days ago spring broke through. The ground has dried out, the snow on the local mountains has disappeared, and everything was ready to move to the next step with the antenna mast I’m putting up in the back yard.
I ran across a “handyman” by the name of Jimmy who was willing to come over and help me get the foundation dug and the cement poured. Yesterday I picked up 21 eighty-pound bags of Sakrete from Home Depot. reserved a cement mixer for today, and got all the tools in readiness. Jimmy arrived a little past noon and we got underway.
Hole Dug, Foundation Poured
When the hole was the right depth we built the cement forms to provide for two feet of concrete with the 4×4 posts in the center. Then we fired up the cement mixer and proceeded to mix twenty-one bags of concrete and pour that into the box.
Three hours later, 2,500 pounds of concrete were in the box ready to cure. I’m pretty sure the wind won’t blow this over!
Jimmy will come back on Monday when we’ll take the forms apart and fill up the hole.
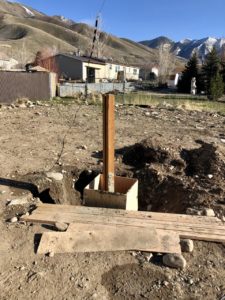
A Closer Look at the 4×4 Posts
Between the two posts is where the 3/4″ galvanized steel pipes will sit. Bolts through the posts and the pipe will secure the mast to the posts. The top bolt, which will be about six inches below the top will serve as a pivot point. Two more bolts will secure the pipe.
The concrete comes up to about three inches below ground level so it can be covered with dirt and grass planted around.
One last item to stick in before we fill in the hole is a copper grounding rod. The galvanized pipe will be secured with a copper strap to the grounding rod. We don’t get much lightning around here, but it’s still a very good practice to ground the pipe!
So, Monday the hole will get filled in and I can start on the mast. I won’t need Jimmy’s help with that.
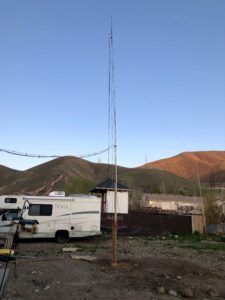
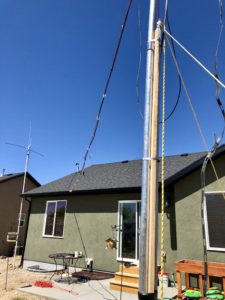
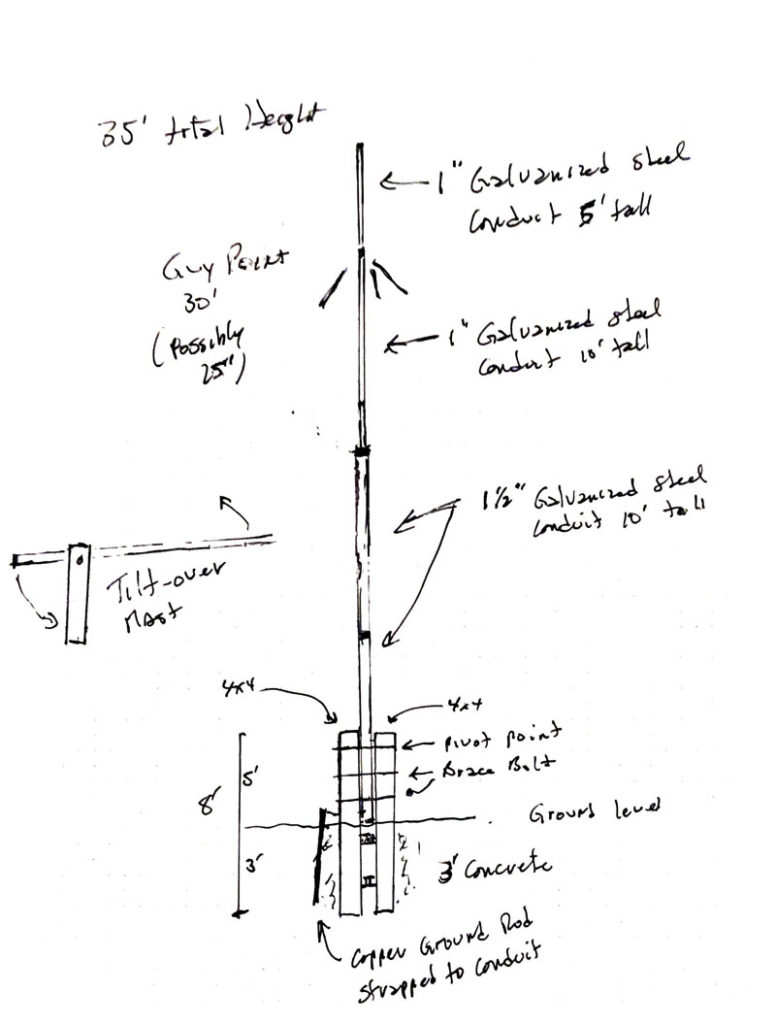
As described in an earlier post, the mast will be thirty-five feet high with a pulley afixed (about six inches from the pipe) to haul up (or down) the G5RV antenna. The window line will come straight down and mounted (with a six-inch standoff) to the 4×4 posts. I’m also going to put a two-meter J-pole antenna at the top of the mast and use that for an AllstarLink node I want to put up here in Tooele. So I’ll be running two coax cables out to the mast. One will be LMR-400 which will connect to the G5RV and the other RG-213 that’ll connect to the J-pole. I’ll run a messenger line from the edge of my roof out (about twenty feet off the ground) to the mast with carabiners every foot or so and the coax will ride in the carabiners. The coax then goes down a pipe up on the roof that I had installed when we built the house and into my shack.
When this is finished in the next couple of weeks, I’ll have the full-sized G5RV running roughly north-north-west to south-south-east diagonally across the back yard. The 2-meter J-pole will be atop the center mast holding up the G5RV.
Across the peak of the roof is a G5RVjr which barely fits on the roof. To the side of the house up about 20 feet are some military poles on which a 2-meter/70cm J-pole is mounted along with a twenty-meter ham-stick dipole. That antenna is oriented north and south to fill in the gap from the G5RVjr across the roof of the house, running east and west.
That will be 5 antennas. Enough for now. I’ll have coverage on 80-meters through 70cm across these antennas. Should be enough for a while.
When I first designed the mast to hold up the ham radio antenna, I felt that three feet below the ground encased in concrete would be sufficient. The engineer, however, came back and said the hole should be four feet deep with 24″ of concrete around the 4×4’s four feet deep (or just about one yard of concrete).
Several weeks ago the contractor who built my house had a track hoe working on a house down the street and he obligingly (and at no cost!!) dug me a three foot by three foot by three foot hole. I was amazed at the number and size of rocks that came up out of that hole. We have very rocky soil here in Tooele, thanks to ancient Lake Bonneville.
This morning I started digging and prying to get another foot or so down. After two hours, I think I’ve gotten four or five inches down. And this 73.9534 year old man is wiped out (another birthday Real Soon Now).
So, I called a handyman listed in the newspaper classifieds (remember those?). He can’t come over until Saturday, but thought he might be able to find someone who could come over on Wednesday. I think I’ll have him help with the whole project including mixing and pouring the concrete and backfilling the hole. Supervisor sounds much better than worker at this point!
The engineering firm completed their work last Thursday. The changes they asked for were minor. They felt that a 24″ diameter footing four feet deep would be better than a three-foot deep foundation. That means 4′ below ground and 4′ above ground, moving the pivot point down one foot.
Everything else was just fine. “The bolts and anchoring posts are sufficient to resist lateral loads at the base.”
So this morning I picked up the starting materials, the 4×4 pressure treated 8′ posts, the first length of galvanized steel conduit, and a bag of Sacreet cement. I’ll get the 4×4’s spaced properly, drill the pivot bolt hole in the 4×4’s near the top, and mix up some concrete. I’ll stand the 4×4’s in a Home Depot Homer’s Bucket and fill that with concrete. That’ll set in the garage for a couple of days before being moved to the hole in the backyard.
The hole is currently three feet deep. I’ll have to climb down there and dig out another foot. I’ll do that while the concrete is setting in the bucket in the garage. That’s going to be a Very Heavy Bucket!!!
The Hole for the Antenna Mast
I still need to stop by Tooele City Planning and get their final approval. I talked with the guy on the phone and read him what the engineer said. He grunted, then said I could proceed but to stop by his office to drop off a copy of the engineering. I’ll do that on Monday.
It’s going to take a week or so, but the mast is coming. I’ve decided to put a 2-meter J-pole antenna at the top of the mast to use for a Allstar node. I’ve got the radio, the Raspberry Pi, and interface unit. It just needed an antenna.
Of course, an antenna needs coax. I had my trusty Xfinity installer guy (lives up the street) come over and climb up on the roof. I have a hundred feet of LMR-400 coax, so he fed that down to me along with a length of Radio Shack RG-58U coax (very lossy coax, but should be sufficient for what I need for an Allstar simplex node). The LMR-400 will connect to the G5RV antenna and the RG-58U will connect to the home-made 2-meter J-pole.
Now that we’re in our new house in Tooele, Utah, getting the radios up and operational are a bit of a priority, obviously behind getting moved in and settled, but pretty high.
One of the criteria for where we were going to build the house was to free of an Home Owners Association or any other CC&R’s. That was successful. So, the first antenna up was a hamstick dipole set for 20 meters. It’s up on military poles at the side of the house, with a 2meter / 70cm j-pole on top. The hamsticks were nicely resonant on 20 meters … until they were up at 20′. They are now resonant a fair bit above 20 meters. Dang.
I hired a local satellite dish installer to come over and put up a G5RV Jr. antenna across the peak of the roof. That antenna is almost directly east and west, meaning it’s lobes are north and south. When it is working, the antenna goes very nicely into Canada…. However, the ladder line comes down from the antenna and then down the roof. It worked pretty well until we got winter. There’s now a foot of snow on the roof burying the ladder line and the SWR is through the roof. As long as there’s snow, I’m back to using the non-resonant hamsticks. Not a great situation.
So, I decided to put up a full-sized G5RV antenna stretching from the peak of the house on the west side to the back of the yard on the southeast side. The antenna would barely fit and would line up approximately north-north west to south-south east. A good orientation. With that, I did a lot of research and designed a fold-over mast to put up in the middle of the back yard where the apex of the G5RV would be up at 35′, about as high as I could get it.
The Mast Design Sketch
So, the next step was to determine if there were any hoops at City Hall I needed go navigate. Unfortunately, there was. The city planner didn’t like my engineering. Even though it would never fall on any one else’s property and was not a fire hazard, he required “real engineering”. So, that’s what’s happening now. I’ve engaged an engineering firm. It’ll cost twice as much to get the engineering done as to actually build the mast.
And, of course, winter has finally arrived. The three-foot hole in the back yard is full of snow. I won’t be able to do anything before April. Dang again.
Ham Radio 360Ham Radio 360 is one outstanding podcast … pretty much top on my listening list each week. In late January Cale Nelson K4CDN had an interview with Kenneth Fennegan W6KWF on the subject of APRS. Kenneth had done his master’s thesis on this system and has a lot of great insight into the capabilities, warts, and options. That interview was very informative and definitely piqued my interest! I have an APRS transmitter from Byonics in my Toyota Rav4 that runs whenever the car is running and in motion. I ordered the unit pre-configured and have not made any changes to the configuration as I had no idea what most of the configuration options meant!
This episode proved to be very popular and generated plenty of questions. Cale posted on Facebook and Twitter that he was going to have Kenneth come back for a followup interview to address these questions.
This week that followup episode was released. It’s about two hours long and answered questions I didn’t even know I had about APRS! I think I now understand how to better set up my Byonics Microtrak AIO transmitter, so I’ve ordered the necessary cable.
If you have any interest at all in APRS, listen to both episodes! They’ll be well worth your time.